The second step in setting up a multi-user world is to have
the Community Place browser recognize
your list of avatars. This is done as follows :
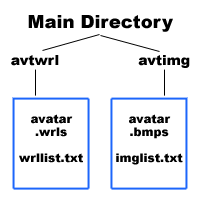
- Create a subdirectory called "avtimg" under your main directory (where your main.wrl file is located).
- In the avtimg directory, place .bmp bitmaps of your avatars. These are the previews of the avatars which will appear in the browser's Avatar selection menu.
- Also in the avtimg directory add a text file called imglist.txt. This file should contain the names of .bmp files you want to include, one per line. The first on this list will become the default avatar. In addition, the list of avatars on the selection menu will appear in the order you enter them in this file.
- Create another subdirectory called "avtwrl" under the main directory.
- In the avtwrl directory place the avatars' .wrl files and their associated .wrl and texture files
- Also in the avtwrl directory create a file called wrllist.txt, similar to imglist.txt above, but with a list of the avatar .wrl files instead. The avatar files represented by each line in these two .txt files must correspond.
A subtle but important point arises in avatar wrl files; if they include references to other files such as Inline geometry or textures, those files must be referred to by path name relative to the main directory. As an example, let boy.wrl be an avatar file in the avtwrl directory. Suppose it refers to a texture boy.jpg which is also in the same directory. Then boy.wrl should refer to the texture as "avtwrl/boy.jpg" rather than just "boy.jpg".
Back to Tutorial Six main page